How to Specify a Diaphragm Seal for Vacuum Applications
Picture this: your solvent‑recovery column has just hit full draw, the control room reads zero psia, and the plant is banking on flawless pressure data to prevent a runaway boil. Then, without warning, the gauge needle creeps up—only it is not the process pressure rising, it is a diaphragm seal that has ballooned from trapped gas and is now feeding the DCS a lie. Within seconds the vent valve slams shut and the column lurches as operators scramble for the emergency controls. The batch is ruined and the downtime bill grows by the minute. All because a single diaphragm seal was never rated for vacuum duty.
Downtime, wasted product, even safety trips can follow from that single weak link. Selecting the right diaphragm seal for vacuum applications is therefore less about ticking a spec sheet and more about protecting the entire operation. In this article, you will learn the five design decisions that turn a vulnerable seal into a vacuum‑proof workhorse.
Key Takeaways
- A true vacuum rated seal starts with fully degassed fill fluid.
- Select a fill fluid whose vapor pressure curve stays below your worst case temperature.
- All welded construction prevents hidden leak paths that suck air into the system.
- Each assembly should be vacuum and pressure tested before it leaves the factory.
- Mount the transmitter below the taps to maintain positive head on the sensor.
Why Vacuum Service Is Tough on Diaphragm Seals
At sea level, the air above any liquid exerts roughly 1 bar of pressure. Inside a vacuum vessel that support is missing, so even a few microliters of dissolved air in the fill fluid will expand violently. The result is false pressure indications, the infamous “pop can” diaphragm failure, and long term drift every time the process cycles between atmosphere and vacuum.
The Five Factors That Determine Success
1. Start With a Fully Degassed Fill Fluid
Reotemp’s Hi‑Vac filling technique warms and agitates the silicone or fluorocarbon fluid while subjecting it to pressures below 1 × 10‑8 mbar for at least 24 hours. That vacuum boil‑off removes virtually all dissolved air, so nothing is left to expand when the system is pulled down to millitorr levels.
Tip: If you must refill a seal in‑house, place the fluid under vacuum for as long as practical, then back‑fill it with dry nitrogen before sealing.
2. Match the Fill Fluid to Temperature and Vacuum Level
Every fill fluid has a unique vapor pressure curve that determines the temperature at which the liquid will flash into vapor at a given vacuum. Figure A on page 2 of the technical brief plots several common fluids. Select a design point that lies to the left or above the curve for your chosen fluid.
| Fill Fluid | Maximum Process Temperature at Full Vacuum (approx.) | Notes |
|---|---|---|
| DC‑705 | 350 °C | Ideal for extreme heat and deep vacuum |
| DC‑550 | 290 °C | Good all‑round performance |
| DC‑704 | 260 °C | Widely used in chemical service |
| DC‑200 | 200 °C | Economical choice for moderate conditions |
| Fomblin Y06 | 180 °C | Fully fluorinated for aggressive media |
| Syltherm 800 | 160 °C | High thermal stability, low toxicity |
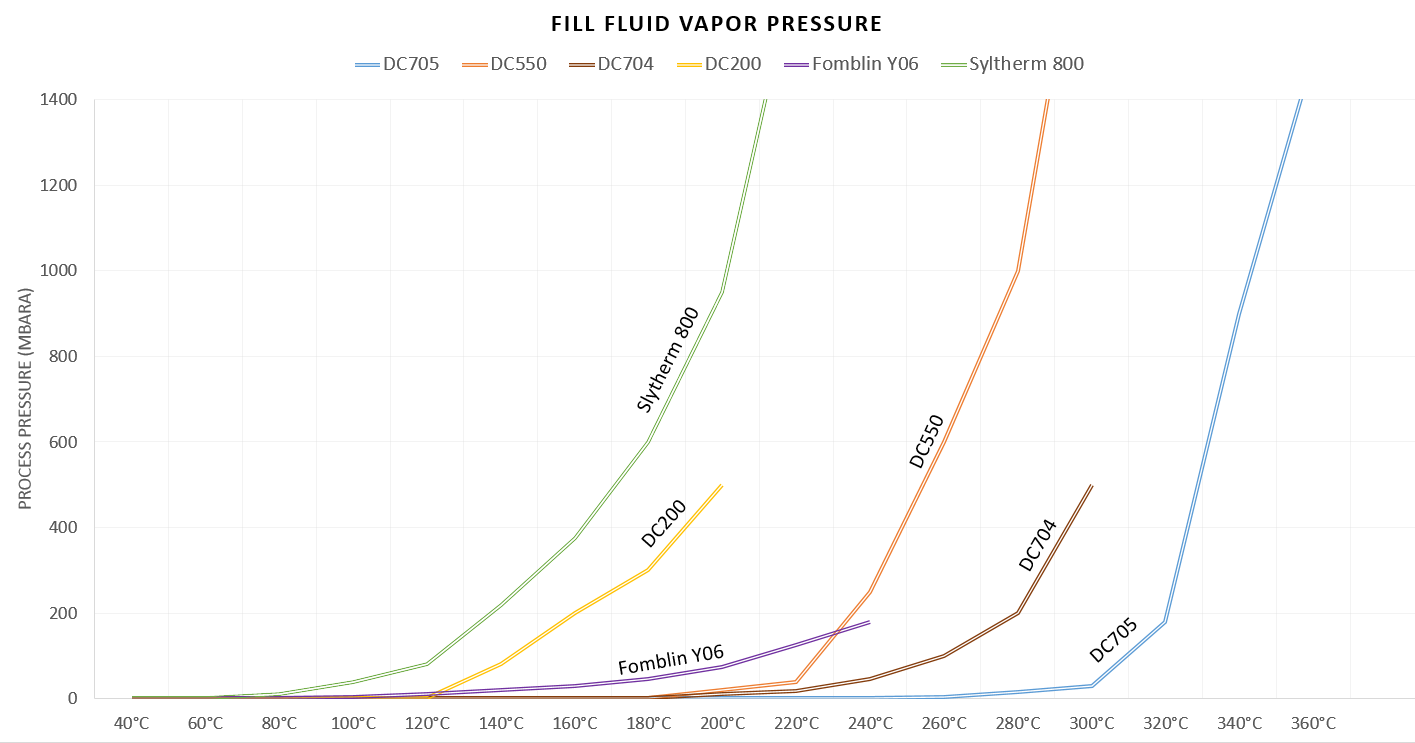
Vapor pressure comparison of common diaphragm seal fill fluids used in vacuum applications
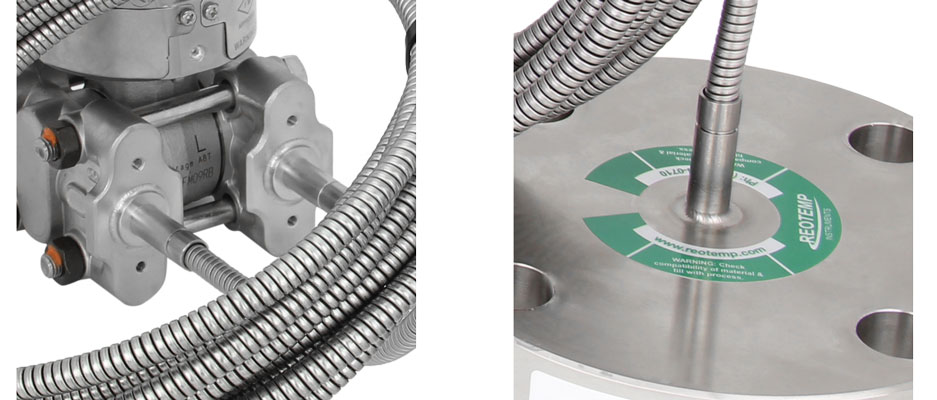
3. Eliminate Threaded and Gasketed Connections
Micro leaks in threads or gaskets become one‑way paths for air when the system cycles to vacuum. Reotemp therefore welds the diaphragm foil to the seal body, all capillary tubes to their fittings, and the transmitter cover flange to the adapter. Field data show that all welded assemblies maintain calibration roughly twice as long as comparable threaded builds in deep vacuum service.
A single capillary thread that admits 0.1 cm3 of air can shift a 4 mA signal by more than 1 % of span in a 0 to 5 psia application.
4. Vacuum and Pressure Test the Finished Assembly
Every differential pressure transmitter built for Reotemp is cycled from full vacuum to maximum rated pressure on both legs. This confirms a balanced fill, proves no trapped gas remains, and verifies all potential leak points under real operating extremes. Ask for the test certificate and keep it with the instrument data sheet to satisfy ISO 9001 traceability.
5. Mount the Transmitter Below the Diaphragm Seals
In vacuum service the capillary fluid can try to pull away from the sensor. By installing the transmitter level with or preferably below the remote seals, gravity creates a small hydrostatic head that keeps the pressure module flooded. Page 3 of the brief illustrates the recommended layout.
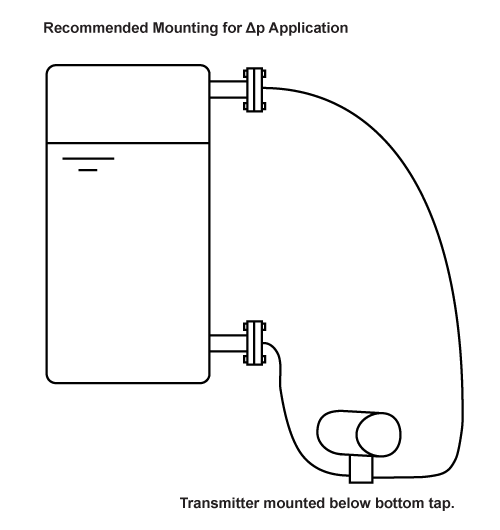
Recommended Mounting for Δp Application
Worked Example
Process: Solvent recovery column
Operating range: 0 to 15 psia, up to 120 °C during cleaning
Required accuracy: ±0.25 % of span
- Choose fill fluid – DC‑200 remains liquid at 200 °C in full vacuum, so 120 °C is within the safe area.
- Degas – Hi‑Vac procedure removes air to 1 × 10‑8 mbar.
- Seal construction – 316 SS body with Hastelloy C diaphragm, all welded.
- Quality test – Factory certificate shows ±0.12 % shift after vacuum cycle.
- Mounting – Transmitter bracket locates 300 mm below lower tap, adding roughly 0.43 kPa of head.
The system has now run two years with drift below 0.1 % of span.
Frequently Asked Questions
What is the lowest pressure a diaphragm seal can measure?
With a perfectly degassed fill, welded construction, and a high accuracy differential pressure transmitter, Reotemp seals routinely measure down to one torr (133 Pa) with ±0.25 % of span accuracy.
Can I retrofit an existing threaded seal for vacuum duty?
Threaded bodies can work if every joint is welded after assembly, but cost and schedule often make a new all welded unit the better choice.
How often should vacuum rated seals be recalibrated?
Most plants recalibrate every twelve months. If the application cycles between atmosphere and deep vacuum several times a day, consider six‑month intervals.
Do I need a different fill fluid for partial vacuum?
If your process never drops below 300 mbar and temperatures stay under 80 °C, standard silicone oil may suffice. Always check the vapor curve first.
Conclusion
Specifying a diaphragm seal for vacuum applications is largely a matter of disciplined fluid selection, leak‑tight construction, and thoughtful mounting. Following the five steps above delivers an instrument assembly that will survive deep vacuum and maintain accuracy for years, saving you costly downtime and recalibration labor.
Resources